This is definitely a work in progress at the moment, I am making it available for possible feedback on easier programming ie. on the 930, more details and edits to follow.
My original posts on exploring automating shell shapes were written in my mylar on 910 electronic days in early 2013: 1, 2. The repeat produced a visually successful fabric. I received a question on FB about executing the shells on a punchcard machine, and another on how I “come up with these things”, so here I am going to attempt to share some of my present thought processes.
Since the time I wrote my original posts my approach to my explanations has changed, I have become increasingly familiar with the software I acquired since then, and now have cable connections that allow for download to 2 model Brother electronic machines. iPhone cameras have made it far easier to “shoot and share”. Initially, I used to often start at step 10 of any technique, now I explore the basics and logic far more.
My original mylar repeat entered as separate programs in days when each sheet was precious.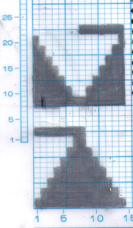 It was written prior to my automatically tiling repeats to check for alignment. Doing so would have shown a couple of missing pixels.
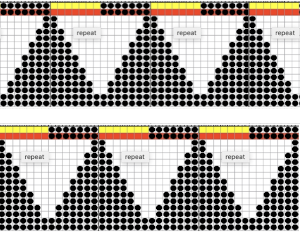
 All transfers were made in the same direction, which now leads me to wonder whether biasing might not be the result in a long piece of knitting. My leaf lace post illustrates modules created manually by holding with the direction of knitting reversed after the completion of each row of leaves. The start of the same concept being applied to the shell shapes:
 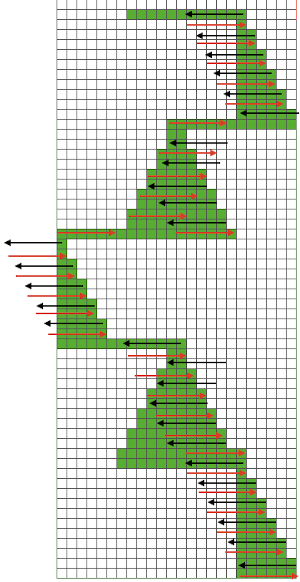 As always, ideas need error-proofing and refining, easier done in a chart if possible prior to any knitting. This type of design would be required to achieve a continuous, uninterrupted repeat on the electronic, whether all in a single direction or reversing every other row of shapes. It is applicable to joining several punchcards, but only on single 24 stitch widths.
 There are a number of changes necessary to get the pattern reverse to work, so for starters, my first attempt is in retaining a single direction. In order to knit such a pattern on a punchcard KM, the repeat needs to be altered from 14X2 to 12X2 in width, this is the start of sorting that out:
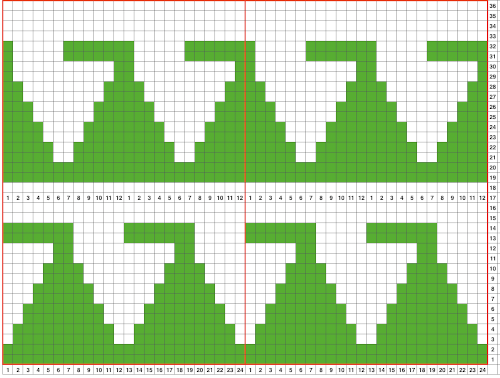 Attempts to visualize holding can happen in spreadsheets, documents, image processing canvases, or even simply on graph paper, moving/ “drawing” back and forth across the cells mimicking carriage movements and marking them accordingly. Large staggered repeats can be programmed in electronics, but are limited in terms of the width of the repeat occurring across the width of the needle bed. Some previous posts on electronic knitting such repeats: 2014/02/24/holdingshort-rows-hand-tech-to-chart-to-automating-with-slip-stitch-1/, 2018/05/20/ayab-short-rows-automated-with-slipstitch/, 2019/08/03/a-return-to-short-row-shapings-bumps-and-slits/
My initial swatches were knit on the 910, which by default produces the knit image as programmed on the knit side. On the punchcard machines, the same is achieved on the purl side. Lettering is likely the most familiar instance. Mirroring the shell repeat may be a necessity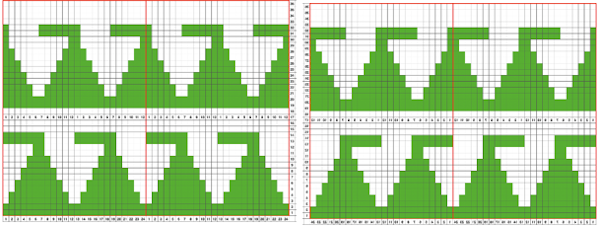 or the moment I will work with the original orientation in an attempt to establish a continuous 24 stitch repeat, with the same technique applicable to electronics thus avoiding programming 2 different repeats. Continuing the evolving process in single direction brick configuration.
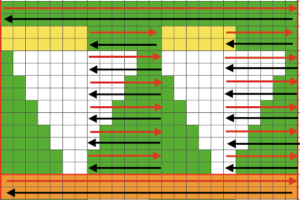
 If the color changer were to be used for changes every 2 rows the complete number of rows would need to be a multiple of 4 in height for each segment. With larger gaps between changes, the yarn may be changed every X rows manually, making an easy fix to breaking that rule. The next step, working out 12 stitch repeats with needles to be brought in and out of holding position. The machine will be set to slip in both directions throughout, end needle selection must be canceled, this is not executable easily on km models that do not offer that option, electronics use KC II. Note that machines sold in Europe in some models may have different names for the same functions, ie. SM in some models is the equivalent of KC II. Punchcard settings:
  I do not have punchcards to test a repeat on at the moment. I do have a 930 that essentially behaves the same way, by producing the entered pattern on the purl side, so I planned on that fact. Adding arrows to my tentative chart reflect the direction of the next movement of the knit carriage
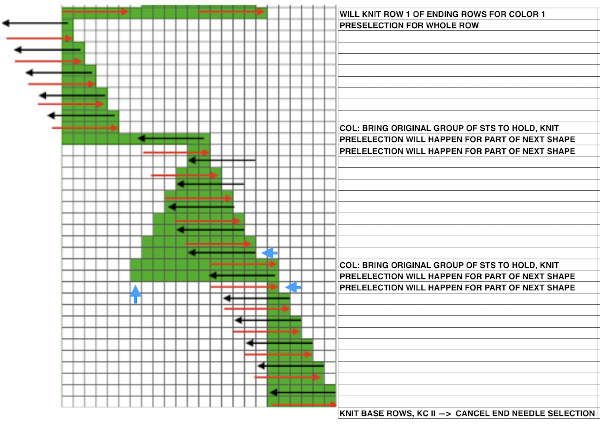
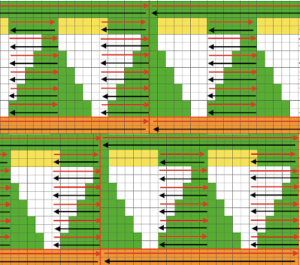
 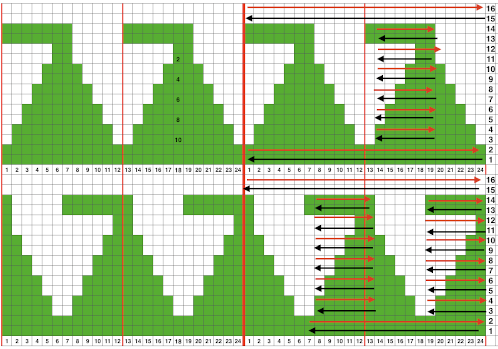 the 24 stitch brick repeat
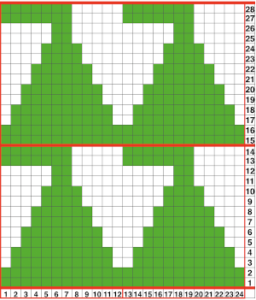 reduced to black pixels/punched holes and mirrored horizontally
 The bottom, curved edge fo each of the shapes is created first. That said, the above used as a continuous repeat is not executable to achieve 2 different shapes on any machine.
A brief return to previous turns at holding and slip stitch used to create alternating color shapes: in 2013/02/12/an-entrelac-pretender/, a continuous slip stitch card was used. The result on the knit side,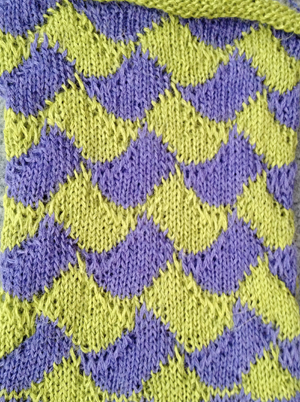 while on the reverse floats between alternating shapes are the norm
 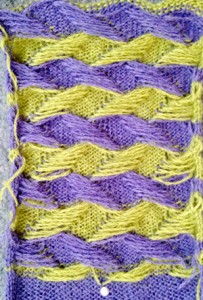 Much better results with no floats are found in the swatches in the posts: 2013/02/21/entrelac-pretender-2/
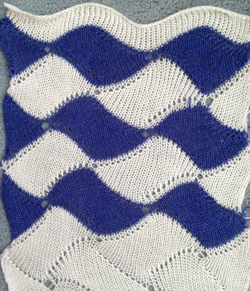 and a larger motif: 2013/04/11/entrelac-pretender-3/
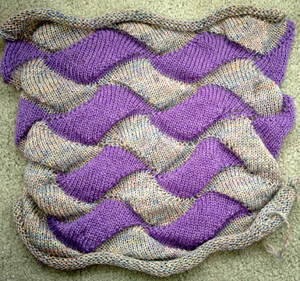 The goal here is to knit the shells in a floatless way. The repeat in question is 28 rows high. If the punchcard or the electronic advances every row with each pass of the carriage, the alternating shifting blocks of the repeat will be selected in full with every 28 passes. In this instance, one returns to the start of the repeat every 28 rows. Identical shell shapes are created across the knitting rather than the shifting shapes desired in alternating repeats.
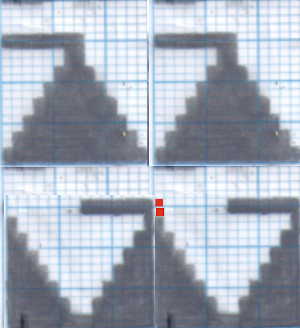
Separating the 28-row repeat into 2-14 row ones, the 12 stitch repeat tiled X2 horizontally since the original question was executing the fabric on a punchcard model machine: the bottom, 14 rows high, would need to be punched X 4. In electronics half of each repeat would be adequate to program only once and entered as an all-over, repeating pattern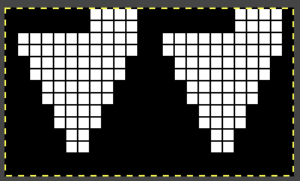 Here the top, also repeated X 4 on a second punchcard, to be programmed separately.
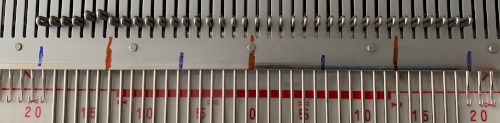
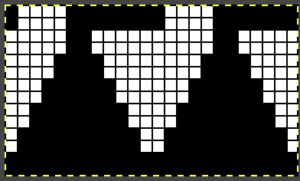 Marking up the needle bed with water-soluble markers or pencils to help track placements of repeats across the desired number of needles in work: